
I recently posted a document entitled “Salesforce Testing with Robot Framework – Intro”. This document is a continuation. Salesforce functional testing like with other web applications, can be accomplished manually and with automation.
Let me give you a brief presentation on testing Salesforce manually. In my test training courses, I mention getting familiar with the application. Then develop test scripts to conduct testing. With this approach you may see a simple and methodical approach. For example, web applications typically have one or multiple levels of menu bars to navigate through the application. That is a good way to start with testing navigation functions. This tests links throughout the application and some external links. Then you can move onto testing page content which then may open the door to more external links requiring testing.
So, to recap our first encounter with a target application for testing. We can quickly identify a strategy for manual testing a typical web application.
- Test Login and Logoff, if needed.
- Test menu bar tabs individually.
- If sub-menu bars exist, test each individual navigation.
- Test each page discovered.
- Verify input data.
- Verify internal/external buttons and links.
- Validate data entry where needed.
- Test data save, delete, and update processes.
This manual approach will not test everything possible for a target application, but it is a good start. But from an automation standpoint you are looking for a way to run a battery of tests against a target application. These tests will be simple to complex test scenarios that can be processed the exact same way each time for as many times as needed. The main idea is to reduce the time it takes this to be accomplished manually. And the automation can be integrated into a CI/CD pipeline to further increase productivity and test effectiveness. A CI/CD pipeline is a series of steps that are performed to deliver a new version of an application.
For the remainder of this discussion, I will demonstrate testing Salesforce login and logout processing. The test tool will be Robot Framework. As you may already know, Robot Framework is primarily a keyword-driven test tool designed to test web, mobile, and GUI applications.
I had a colleague of mine demonstrate a LoadRunner TruClient software test of Salesforce. He chose to start with login and then a menu bar link test. Just in case you are not familiar with the tool, TruClient. It is LoadRunner’s offering for another keyword-driven test script development tool, like Robot Framework. Well, the TruClient script was recorded quickly and was ready for successful test execution. I was amazed but not surprised – the tool is part of a commercially licensed software product.
I do not mean to down-play Robot Framework. Some tool engineers come out of the box with software that easily recognizes application test objects. This makes the script readiness much easier. Recognizing application test objects and creating a repository demonstrates the tool is learning – getting familiar with the application under test. This is important. But I believe Robot Framework is headed in that direction.
In the meantime, I must prepare for a trial-and-error period as part of automation test activities. So, for Robot Framework automation test development activities. Here is an approach.
- Identify buttons, images, and links that cause application navigation processing.
- Determine what screen object definitions Robot Framework recognizes with detection keywords and action keywords.
- Develop and debug a script that is repeatable.
Let me start using the Salesforce application for an example. The rest of this discussion will demonstrate building a Login/Logout test scenario. Okay, what do we need to demonstrate a Login/Logout test scenario in Robot Framework?
- I recently requested a 14-day Salesforce trial.
- Salesforce provides you with a URL to your own version of the Salesforce application.
- They provide you with a user account and password.
- Turnoff 2-step login with verification code requirement (see How to Turnoff Verification Code)
- Develop Robot Framework script
Salesforce Help Sites
Salesforce is growing in popularity. Salesforce claims the highest position in the Customer Relationship Management software market. It is not hard to find information. Because it demonstrates a commitment to its community. Here are a few sites to gain knowledge of how to use and work with the Salesforce application.
- The marketing perspective for Salesforce – https://www.salesforce.com/
- Help site via the Trailblazer Community – https://help.salesforce.com/
- Specific help – Can you turnoff the verification code? – https://trailblazers.salesforce.com/answers?id=90630000000glBgAAI
- The Developers Forum site – https://developer.salesforce.com/forums/?id=906F000000099apIAA
These URLs represent a few places on the internet set aside to support you becoming familiar with the Salesforce application. But by no means is it extensive. The last two links I used to get more knowledge about a verification code feature within Salesforce that is designed to assign more security protection for manual use and automated use of Salesforce. More to come on this.
Request Salesforce Trial
Salesforce is approachable with their software. They provide a good trial version of the software to allow you to kick the tires and truly become familiar with the application software. I view this offering from Salesforce as extremely helpful for consultants like myself. Business analysts, Developers and software testers are provided a chance to learn about this popular software. Even small businesses have benefit in using the software over an extended length of time for an affordable monthly subscription fee.
So here is what you do to start with a trial. Click here to signup. You should receive an email with the link to your trial Salesforce application along user credentials.
Verify Your Salesforce Application
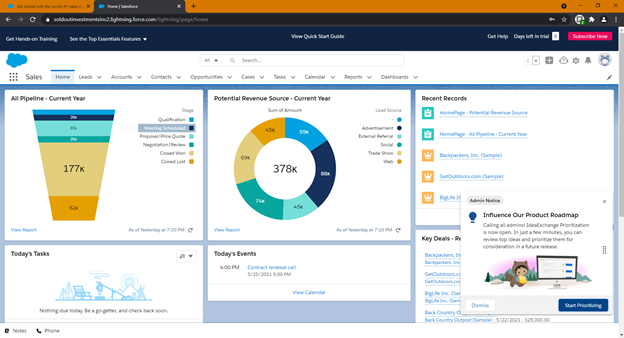
Once you have the Salesforce application link and user credentials you are by default setup with administrator privileges. Login to the application from the supplied link. You should see an application display that looks like the following. The intent here is to show and not to teach. This is a sample of the home page.
If you have gotten this far with your trial Salesforce this is good. To logout click on the far-right icon that looks like this image.

You should then see a pop-up window with a link to Log Out. This is your first lesson on logging into and out of Salesforce. Log in again and become familiar with the icons by first hovering to find out their reason for existence. Then hover over and click on each of the menu bar items which looks like the following.

Each selection navigates to a new page within the home page. Each down-arrow leads you to create a new object. You now have plenty to test if you are a tester.
Salesforce comes to a customer with much functionality that is tested by the vendor’s development team. So, testers representing a customer do not have to focus their testing cycles on this functionality. Instead, the focus should be on customer configuration and customization. However, a QA tester knows that one should not ignore the opportunity to do regression testing. Therefore, new releases of Salesforce should be regression tested.
How to Turnoff Verification Code
Manual testing of your trial version of Salesforce where you are logging in and logging out frequently is no difficult challenge. However, when you are trying to interact with a test tool like Robot Framework it is a challenge. If you do not turn off its two-step login requirement, you are in for a surprise. After you provide your user credentials for login, Salesforce presents another security window requesting a verification code. The code is generated and sent to you by SMS text to your phone or email address. You must manually enter the code successfully to enter the Salesforce application. This may not be annoying for a manual process, but it is an issue for test automation.
For tools like Robot Framework not using your default browser, you must include code in your test tool to allow wait time between login and application test coding. I did this and found it annoying because after six times, another message appears from Salesforce that requires you to wait for about an hour before you can run more test iterations with you tool.
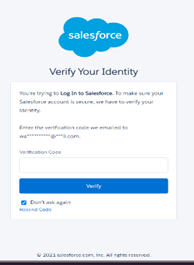
The Verify Your Identity window only appears when you are not using your default browser to access the Salesforce application. The issue is that by default the application is set to require this request if you are not using the same IP address you used when you first logged in to Salesforce. That information is stored. You can find out in the Salesforce SETUP administration data what IP address is in normal use, but you cannot find out what IP is failing. Also, you cannot uncheck the setting for turning on Identity Verification Code. So, it creates a quandary.
After several hours of research on the help sites, I found information on the Trailblazer community site. I also found more precise help on the Salesforce Developer forum site. Several individuals were going back and forth with the solution and disputing the solution. The came forward with the final resolution.
The resolution to resolve turning off the Identity Verification Code window is to supply an IP range. Might seem odd but it works! The last two links I mentioned in the Help sites section earlier provide the details. The IP range must be 0.0.0.0 and 255.255.255.255. This information must be entries in the Administration Profile data window under SETUP.
As soon as I saved that change, logged off, and reran the test, I no longer saw the Identity Verification Code window. Free at last!
Develop and Test Login/Logout Script
Now we are ready for a brief test execution of Robot Framework to test Salesforce. The objective is to test logging into Salesforce and logging out. That is significant because identifying the right test object definitions for each element is not always easy. Working with the right sequence of Robot Framework keywords can be a challenge as well. But once you have them it becomes easier for other test objects in the Salesforce pages.
Two Selenium hints were provided by the Salesforce team due to there endorsement of Robot framework. These two hints help with defining test objects on Salesforce pages.
- A test object can be defined using “//*[text()=”text reference”]”.
- A test object can be defined using “//*[@title=”title reference”]”.
When these hints are honored, it is not difficult to generate the right test object definitions for Salesforce page test objects. The two formats mentioned are also known as XPATH locators. So, I can specify the following and reference more than one HTML tag or only reference one. The objective must be to locate one HTML tag. Look at the following possible XPATH locators.
- //*[text()=”Log Out”]
- //a[text()=”Log Out”]
- //img[text()=”Log Out”]
If the HTML code had both an “a” tag and an “img” tag, the first XPATH locator would find two tags that match. This would fail in Robot Framework. But the second and third locators should pass the Robot Framework test at least for detection. Keywords for a button should work for item 2. But item 3 would require the use of RF image keywords.
I will not take you through the thought process I went through to create a working Robot Framework script. For that I am going to provide a video tutorial, and I will add a link to it in this discussion. The video will be a combination of Salesforce and Robot Framework Introduction lessons.
Here are screen shots of what my working test looks like. Of course, this discussion is based on you having some knowledge of Robot Framework. First is the test script. Please notice the user credential definitions follow the hinted formats. Also, the other references or XPATH locators use the hinted formats.
${UserNameElement} = xpath=//*[@id=”username”]
${PassWordElement} = xpath=//*[@id=”password”]
${SubmitElement} = xpath=//*[@id=”Login”]
*** Test Cases ***
Test Salesforce SOI App Login
sleep 3s
Enter Credentials and submit ${username} ${password}
*** Keywords ***
Begin Web Test
open browser ${URL2} ${BROWSER}
maximize browser window
Sleep 1s
#Go to ${URL2}
End Web Test
Sleep 5s
Set Focus To Element //img[@title=”User”]
Mouse Over //img[@title=”User”]
Mouse Down On Image //img[@title=”User”]
Mouse Up //img[@title=”User”]
Wait Until Element Is Visible //a[text()=”Log Out”] timeout=10s
Capture Page Screenshot
${WebElementResult} = page should contain element //a[text()=”Log Out”]
log ${WebElementResult}
Set Focus To Element //a[text()=”Log Out”]
Press Keys //a[text()=’Log Out’] RETURN
Close Browser
Enter Credentials and submit
[Arguments] ${username} ${password}
clear element text ${UserNameElement}
clear element text ${PassWordElement}
input text ${UserNameElement} ${username}
Click Element //div[@id=”main”]
input text ${PassWordElement} ${password}
click button ${SubmitElement}
I used several Robot Framework keywords for detecting locators, such as SET FOCUS and WAIT UNTIL. I then used multiple different keywords for performing action on the locators such as MOUSE and CLICK and PRESS KEYS. All of them processed successfully. Look at the test results below.
Collapsed Level Test Results
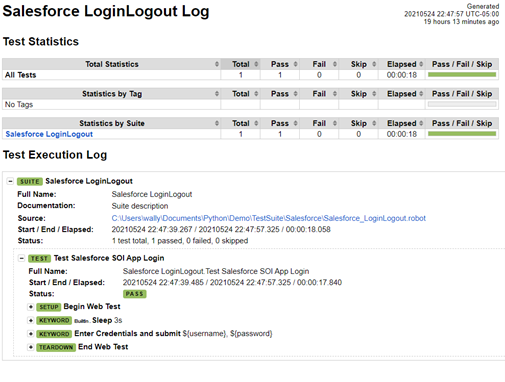
The Robot Script represents a single test case conducting a login and logout execution. The script is divided into three keyword functions – Begin Web Test, Enter Credentials and submit, and End Web Test. I will expand these keyword functions below so you can see the details.
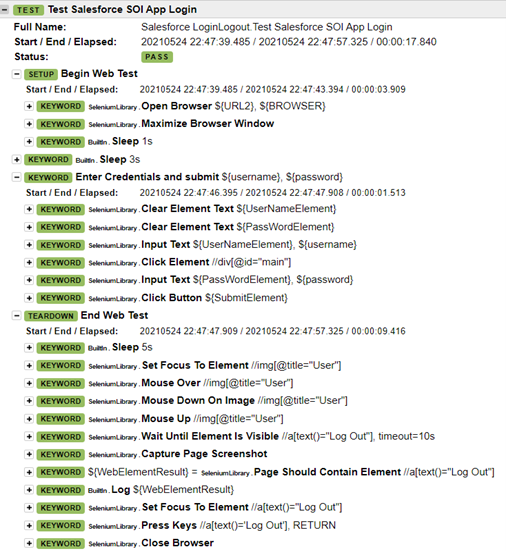
The keyword functions have the objectives as listed in the list below.
- BEGIN WEB TEST
- Pass the Salesforce URL and what browser to use – Chrome.
- Maximize the browser window and wait 1 second.
- ENTER CREDENTIALS AND SUBMIT
- Make sure the user and password entry fields are empty.
- Enter the username and password, and then click the SUBMIT button.
- END WEB TEST
- Wait 5 seconds before starting end processing.
- Set the focus on the icon.
- Apply three MOUSE keywords on that icon object to test recognition and action.
- Wait until the pop-up window displays to show the Log Out link.
- Give it 10 seconds, and then capture a screenshot to confirm pop-up.
- Do another test to confirm the Log Out object locator is present.
- Set the focus on the Log Out object as one more recognition test.
- Click on the Log Out link to shut down the application.
- And then close the browser and bring the test to an end.
I received a comment on another post that referenced another testing tool designed specifically for Salesforce application testing. Here it is:
Thanks for sharing such a knowledgeable blog on Salesforce testing , to know more about the Oracle Ebs Accelerator , refer to the following link – https://www.opkey.com/ for Salesforce Testing.