
Bug Life Cycle Training
Table of Contents
Test Cases for the Login User Scenario
SRS for the Register User Scenario
Test Requirements for Register User Scenario
Test Cases for the Register Scenario
Section 2
Closing Remarks
I want to address several items to close out this training module. First, I want to talk more about the concept of bug report, or bug reporting. I hope to clarify some thoughts in case you don’t have this concept clear in your thinking. As it was referenced in this training module, you can get the impression that the term bug report is for a single defect or issue. And maybe bug reporting is the process of doing one or more bug reports.
A bug report should contain the following data: reference number, title, severity, priority, description, environment, steps to reproduce the problem, expected result, actual result, attachments (screenshots, videos, text). It can also be a full report or a periodic report. In these cases the report is inclusive of more than one defect. It is a list of open defects with an appendix to include the attachments. I don’t mind telling you that this can be expensive creating because of the time involved in preparing the report.
This identifies another reason for having a bug management tool. With the tool there are usually features that allow viewing a single bug or a list of bugs. And additional features provide search or filtering for a viewer to locate specifically what they want to see. As long as the defect data is kept current, the information is immediately available each day, week, and month. So, management and business users on the project have the data readily available.
The second item I want to convey is in the real world today there are distributed project teams located in various geographic places. This adds to the challenge of keeping everyone informed and interacting with each other. Tools like the test management and bug management software become an essential way to make the processes successful. If you get in early on a test project and you understand how useful these functions are, then you can be among those who impress others to ensure the software is utilized.
Now my third item is the last for closing out. I plan for closeout not only for you to work with two test management and bug management tools, but I am going to demonstrate two online cloud-based tools in a few minutes.
Let me introduce the tools. The first tool we look at is a tool called Zoho. It is a bug tracker software that is readily available on the internet. I hear that it has become popular, and I have never used it until I started preparing for this training. I hope you will find it of value. I should take a moment to tell you that this tool is strictly capable of handling bug tracking. It is not a test management tool. If you wanted both capabilities our lab session today will provide you with exposure to that type of tool.
The second tool is called QA Touch. It is a test management tool. This means it is a tool that handles test cases and handles bug tracking. You may find both attractive. But I want to inform you that it is important to understand your clients’ needs or your employer’s needs. If you work on a test project that is in a fortune 500 company, it is highly likely that the company’s security policy will not easily accept a cloud-based tool unless it touts high security features. But it’s not impossible. Other companies may not find issues with these tools. Then it’s just a matter what meets the needs.
Let me get started with demonstrations.
- Zoho Bugtracker: https://www.zoho.com/bugtracker/
- QA Touch Test Management: https://www.qatouch.com/free-test-case-management-tool/
Software Demonstrations
There are many software tools that fit into the test tool space. Some are known as automation tools, some are known as test case management tools, bug management and test management tools. I want to use this demo session to familiarize you with bug and test management software tools.
Before I start the demo, please understand that bug management is a part of test management. Sometimes you will find test management tools that include bug management features and sometimes they will only integrate with a bug management tool. That is a good reason why we evaluate software before implementing.
Software Bug Management Tool
For this bug management tool demo, I have chosen a product known as Zoho Bug Tracker. The tool is on the internet. It has a free component. The no cost version is based on the number of users. One or two users pay no fee. To use all it takes is the time to setup an account.
I added a couple bugs to start evaluating. I will spend a few minutes launching and navigating through some of its features and functions.
Let’s begin.
Software Test Management Tool
In the Test Management tool demo, it will take a little more time because of the features and functions available. This tool normally supports test requirements entry, test analyst data entry, test suite entry, test case entry with steps, test run and results entry, and defect entry. To complement the data entry it supports relationship management, coverage analysis, analysts’ assignments, and data update and removal.
The tool I selected for this demo is named QA Touch. It is also online and free for a single user. However, there is a caveat with setup. Setup is designed to use your email domain. In other words, your email address must be one for a valid website like a company you work for. I don’t have a company website, but I have a business website. So, it took them two rounds of work effort to finalize my setup. If you decide to setup an account and you work for a company, you should have no problems getting setup.
Let’s begin.
Assessment
In this lab session, we’ll dive into the Bug Life Cycle and explore each stage in detail. We’ll start by reviewing the various stages of the Bug Life Cycle, including report, reproduction, analysis, fix, test, verification, and closure.
Next, we’ll look at the bug handling process in more detail, including how bugs are reported, confirmed, and analyzed. We’ll also explore how fixes are created, tested, and verified.
Finally, we’ll walk through a case study to see the Bug Life Cycle in action. We’ll work through the process of reporting a bug, confirming, and reproducing it, analyzing the cause, creating a fix, testing the fix, verifying that the bug has been resolved, and closing the bug.
By the end of this lab session, you’ll have a solid understanding of the Bug Life Cycle and the bug handling process, and you’ll be well-equipped to effectively manage and resolve software defects in your own projects.
The SBLC Process Flow
![]()
SBLC Flow Diagram
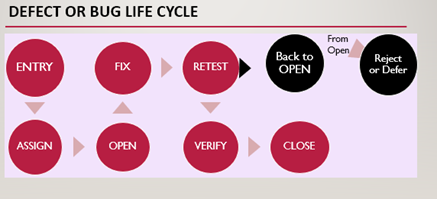
- When the tester finds a new problem, a bug is created, and the status of the bug is set as “New”.
- Once the bug is reported by the tester, the tester or a lead assigns the bug to a developer. The bug status can then be set to ASSIGN or ASSIGNED if those options are available.
- When the developer starts analyzing and works on fixing the bug, an available status might be OPEN. That helps let everyone know someone is working on the bug.
- When the developer makes necessary changes to fix the problem, the bug status can be changed to FIX or “Fixed”.
- Then there is the retest. The norm is to wait for the next triage. At that time the bug status will be discussed and changed to RETEST. The tester who reported the bug usually does the retesting or issue check to confirm the status. And the bug is reassigned to the tester.
- When the tester completes retest the bug status can change to REOPEN or VERIFIED or CLOSE. If the same bug is not detected, then the bug is considered fixed and the status is set as “Verified”. On some projects the tester can go ahead and close the bug. But some teams like to review the VERIFIED status in the triage one more time.
- If the same bug persists even after the fixing, the tester sets the status as “REOPEN” or “REOPENED”. Then the previous steps are applied to the bug once again.
- If the bug no longer exists, then the tester sets the status as “CLOSED” or the next triage session will review and change the status.
SBLC Exception Handling
- If the bug is repeated twice or corresponds to some other bugs, the status is set as “DUPLICATE” by a developer.
- If a developer decides the bug is not a valid defect or it does not affect the functionality of the application, then it can be set to “REJECTED”.
- If the bug is not high priority, or it is decided to get fixed in the next release, or the fixing of the bug depends on something, then the status “DEFERRED” is set.
- The above diagram and steps only explain the logic of SBLC. In practice, these robotic steps can cause communication issues sometimes. It is up to the developers to avail there time to
These test requirements cover the functional requirements of the Login User use case from the Requirements Specification document. These test requirements will ensure that the system functions as intended and will help to identify any defects in the software.
Test Cases for the Login User Scenario
| Test Case ID | Test Case Name | Test Case Steps | Expected Results |
| TC_LoginUser_1 | Test Login Navigation | 1. Click on the “Login” button. 2. Verify that the system displays a form requesting the user’s username and password. | |
| TC_LoginUser_2 | Test Valid User Login | 1. Enter a valid username and password. 2. Click on the “Login” button. 3. Verify that the system checks the user’s username and password against all registered users. | |
| TC_LoginUser_3 | Test Login Message Display | 1. Enter a valid username and password. 2. Click on the “Login” button. 3. Verify that the system starts a login session. 4. Verify that the system displays a welcome message based on the user’s preferences. | |
| TC_LoginUser_4 | Test Invalid Password Login | 1. Enter a valid username and an invalid password. 2. Click on the “Login” button. 3. Verify that the system displays a message requesting the user to re-enter the password. 4. Enter a valid password. 5. Verify that the system checks the user’s username and password against all registered users and starts a login session. | |
| TC_LoginUser_5 | Test Invalid User Login | 1. Enter an invalid username. 2. Click on the “Login” button. 3. Verify that the system displays a message indicating that the username is invalid. 4. Enter a valid username. 5. Enter a valid password. 6. Verify that the system checks the user’s username and password against all registered users and starts a login session. |
SRS for the Register User Scenario
| Use Case Name: | Register User Scenario |
| Summary: | To get personalized or restricted information, place orders or do other specialized transactions a new user must click the register button on the home page to add a username and password. |
| Basic Flow: | 1. The use case starts when a user indicates that he wants to register. 2. The system requests a username and password on the Register page. 3. The user enters a username and password. 4. The system checks that the username does not duplicate any existing registered usernames. 5. The system requests a name (*), street, city, state, zip code (*), phone and email address. Items marked by (*) are required. 6. The user enters the information and clicks the ACCEPT button. 7. The system determines the user’s location and access level and stores all user information. 8. The system executes use case Register Preferences. 9. The system starts a login session and displays the Place Order page with a welcome message based on the user’s preferences. |
| Alternative Flows: | Step 4: If the username duplicates an existing username the system displays a message, and the use case goes back to step 2 unless the user clicks the CANCEL button to return to the home page. Step 5: If the user does not enter a required field, a message is displayed, and the use case repeats step 4. The user can proceed with entry or click the CANCEL button to return to the home page. |
| Extension Points: | Register Preferences |
| Preconditions: | none |
| Postconditions: | The user can now obtain data and perform functions according to his registered access level. |
| Business Rules: | · A registered user’s location is the SBE location nearest his zip code. · Access levels are o 0: A user can access only data classification 0 o 1: The user can access data classification <= 1 o 2: The user can access data classification <= 2 The default access level is 0. |
Register Preferences
| Use Case Name: | Register Preferences |
| Summary: | This use case allows a registered user to enter or change his preferences. |
| Basic Flow: | 1. The use case starts when a user indicates that he wants to enter or modify his preferences. 2. The system displays all current product lines. It indicates any product lines that the user has currently selected. 3. The user selects/deselects product lines or clicks the RETURN button to display the home page. 4. The system displays current language preferences. It indicates the language preference currently selected. 5. The system displays the SBE location nearest user zip code area. 6. The user may select a different language preference or click the RETURN button to display the home page. 7. The system stores any change to language preference. |
| Alternative Flows: | none |
| Extension Points: | none |
| Preconditions: | The user is logged in. |
| Postconditions: | The system can customize a welcome message based on the user’s revised preferences. |
| Business Rules: | Language selections allowed are English (default), French and German. |
Test Requirements for Register User Scenario
| Test Requirement ID | Test Requirement Name |
| TR_RegisterUser_001 | Verify that clicking the register button on the home page takes the user to the registration page. |
| TR_RegisterUser_002 | Verify that the registration page requests a username and password. |
| TR_RegisterUser_003 | Verify that the registration page requests the user’s name, street, city, state, zip code, phone, and email address. |
| TR_RegisterUser_004 | Verify that the system checks that the username does not duplicate any existing registered usernames. |
| TR_RegisterUser_005 | Verify that the system determines the user’s location and access level based on the zip code provided. |
| TR_RegisterUser_006 | Verify that the system executes use case Register Preferences. |
| TR_RegisterUser_007 | Verify that the system starts a login session and displays a welcome message based on the user’s preferences. |
Test Cases for the Register Scenario
| Test Case ID | Test Case Name | Test Case Steps | Expected Results |
| TC_RegisterUser_1 | Test Register Navigation | 1. Click the Register button on home page 2. Verify navigation 3. Click the CANCEL button. | The registration page displays, and the system returns to the home page |
| TC_RegisterUser_2 | Test Registration Prompts | 1. Click the Register button on home page 2. Verify messages 3. Click the CANCEL button. | The Registration page requests a username and password |
| TC_RegisterUser_3 | Test Registration Entry | 1. Click the Register button on home page 2. Enter new username and password 3. Click the ACCEPT button 4. Enter user’s name 5. Click the ACCEPT button 6. Enter zip code 7. Click the ACCEPT button 8. Click RETURN button | The registration page requests all required data Message prompts disappear Required field msg prompt New req field msg prompt
Reg Pref page appears Msg indicates acceptance and proceeds to the Register Preference page |
| TC_RegisterUser_3a | Test Registration Entry | 1. Click the Register button on home page 2. Enter new username and password 3. Enter user’s name, street, city, state, zip code, phone, and email address 4. Click the ACCEPT button 5. Click RETURN button | Registration page displays
Message prompts disappear
Reg Pref page appears Returns to home page |
| TC_RegisterUser_4 | Test Reg Duplicate Name | 1. Click the Register button on home page 2. Enter old username and password 3. Enter user’s name, street, city, state, zip code, phone, and email address 4. Click the ACCEPT button 5. Click CANCEL button | Registration page displays
Message prompts disappear
Duplicate username error Returns to home page |
| TC_RegisterUser_5 | Test User Preferences | 1. Click the Register button on home page 2. Enter new username and password 3. Enter user’s name, street, city, state, zip code, phone, and email address 4. Click the ACCEPT button 5. Click MODIFY button 6. Verify store is correct based on zip code | Registration page displays
Message prompts disappear
Reg Pref page appears Update MSG confirmed Correct store zip code displayed |
| TC_RegisterUser_6 | Test Language Preference | 1. Click the Register button on home page 2. Enter new username and password 3. Enter user’s name, street, city, state, zip code, phone, and email address 4. Click the ACCEPT button 5. Change language preference 6. Click MODIFY button 7. Verify language preference changed 8. Check for welcome message | Registration page displays
Message prompts disappear
Reg Pref page appears
Update MSG confirmed Modified language shown Place Order page appears with a welcome message |
| 1. |