
Test Automation
Table of Contents
Advantages using Hybrid Framework Build
Disadvantages using Hybrid Framework Build
The AUT or Application Under Test
Test Environment (Testing, Staging, Deploying)
Test Case Library – Actions, Functions, Utilities
Administrator – an individual who manages large framework environment
Automation Test Tools (*Lab sessions included)
Tools and techniques for Web Service API testing
Web Application Testing (Act 1)
Introduction to Playwright Testing
Definition of Playwright Testing
Components of Playwright Testing
Setting up for Playwright Testing
Writing and Executing Playwright Test Cases
Verify a Web Application Login Functionality
Web Application Testing (Act 2)
Introduction to Selenium Testing
Definition of Selenium Testing
Components of Selenium Testing
Setting up for Selenium Testing
Writing and executing test cases with Selenium
Hybrid Framework – Section 2
When more than one framework is combined to meet the target application test requirements, it is known as a hybrid. A keyword driven or modular framework can benefit much from being combined with a data driven framework. Thus, a hybrid framework can often be a good choice to meet an application’s test automation requirements.
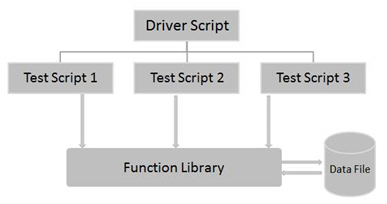
With the hybrid framework you can incorporate the best of each of the other frameworks. It may not be apparent in the diagram. But each test script may break down into blocks of code that are modular and reusable. The data file may have data that drives the testing in tandem with the driver script. There may be keyword processing included to assist with controlling and making the scripts more dynamic based on the application requirements. The function library can be loaded with reusable functions usable by more than one application. Corrections or enhancements to the function library can be easier and less complicated.
Advantages using Hybrid Framework Build
- Does not limit an application test requirement
- Flexible and powerful
- Can be feature rich
Disadvantages using Hybrid Framework Build
- May always require a knowledgeable automation test developer
Framework design strategy
Frameworks are not born. They are developed. As AI gets more involved in automation test tools, you will see the birth of application test frameworks. For now, it is feasible to consider designing a framework with maintenance in mind. In other words, think of the test requirements and how they relate to the target application test objects. For instance, what are the screen objects, actionable objects, display objects on a screen, and input objects on a screen? Which objects require existence tests, range tests, value tests, size tests, calculation tests, security tests, or validation tests? Are all input and display objects active whenever a screen object displays? Are all possible tests necessary whenever a screen displays in the application? Answers to these questions determine how simple or complex a framework design needs to be.
In fulfilling test requirements during building a framework, consider the smallest test objects first. Some test objects may be repeated on multiple screen objects or in multiple table objects. If the object is used repeatedly, the code for testing should be reusable. It should have its own function written.
Each test object function written should have all the possible tests necessary to meet its use on target screens. If a test object is not always active on a target test screen object, then the test object may need keywords or keyword actions to control its testing. Input spreadsheets can also be used to control some test object testing. Some test objects are dynamic. This means they display on a given screen object based on the condition of the screen display. Is the screen being used for validation, data input, data reporting, or some other reason? The test object may not exist, display as output, or display for entry. The dynamics determine the scope of tests needed.
It might be feasible to consider designing a framework with some other variance in mind. Suppose the target application changes test objects often for security reasons. Maybe screen flow is an issue. It changes based on business flows which might be controlled by regulatory statutes. Some applications are highly dependent upon safety regulations that promote change or complex demands. For these reasons, a framework chosen may need flexibility and the ability to handle complexity to meet the dynamics of the target application test requirements.
To meet the requirements a framework may need to include multiple test data input files, one or more repository files to describe test object behavior, and a keyword file to describe test flow and test actions. Multiple function libraries may be needed to include and exclude based on time of year, test environment, or company location, as examples.
Framework design & planning
Overview
An automation test framework is an integration of rules to meet the functional test requirements of a target software application. The two main development guidelines to follow in developing a test framework are to build common practices, and assumptions for the desired test outcome.
There are several components that define the structure of a framework. The list follows:
The AUT or Application Under Test
- Application build based on SDLC/STLC delivery approach
- The two life cycles combine to cover software application development and testing phases
- Software delivery to production is delayed until all business requirements for a project is met via user acceptance
- Application build based on Agile methodology
- Agile methodology is designed to remove barriers and enable collaboration. It focuses on processes highlighting change while accelerating delivery frequently.
- CI – continuous integration – a practice to integrate change improvements rapidly (hourly, daily, weekly).
- CD – continuous delivery – a practice of packaging and deploy to enable delivery cost savings.
- CT – a practice that supports up to 24-hour automation testing to ensure development environment changes are checked constantly for quicker turnaround of bug detection.
- DevOps focuses on culture where roles emphasize responsiveness.
Test Environment (Testing, Staging, Deploying)
- System Integration Testing – Tests the system from end to end.
- User Acceptance Testing – Allows the user to validate the functionality over time.
- Pre-Production – pseudo-Production focused on production configuration setup and turnover
Test Case Library – Actions, Functions, Utilities
- Actions and functions provide the reusable test building blocks
- Utilities provide initializing, cleanup, and reporting support
Automated Testing Practices
- Document how to automate test cases using the selected framework
- Automated test case template
- List of all utilities and guidelines for usage
- Library and object repository maintenance procedures
Automation Tools
- Test Automation Tools
- Traffic Generation Tools
- Traffic Monitoring Tools
- Test Support Tools – requirement analysis, defect tracking, test management
Administrator – an individual who manages large framework environment
- manages test case libraries, test environments, and test tools,
- maintains the inventory of templates,
- provides tutorials,
- helps test engineers in writing test scripts using the test case libraries.
Framework Structure
In a framework structure we see it more prevalent in a hybrid framework. However, all frameworks should make use of a similar structure. It should include these components.
- Master Driver − A Script or utility that drives the entire execution. It performs prerequisite and initial settings that are required for the execution.
- Library Files − The Associated Functions that forms the Function Library.
- Data Tables − The Test Data that is required for the Execution.
- Object Repository − The Objects and its properties that enable UFT to recognize the objects seamlessly.
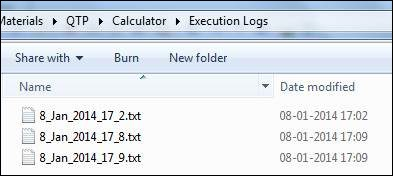
- Execution Logs − The Folder contains the execution log file with user functions and function execution history.
I want to spend more time talking about these five structures that you should consider when building a test framework. Don’t think of it as needing to have solutions for all structure elements. Just keep in mind what are the needs and give that priority.
Master Driver Control
I have implemented a VBScript or a command from the test tool. I have also used a job management tool like Jenkins. There are many other choices that can be implemented to achieve scheduling one or more test scripts for execution.
For UFT scripts its companion software ALM supports running UFT scripts on a scheduled or unscheduled basis.
Since Robot Framework scripts can be executed using Robot.exe it can also be executed on a scheduled or unscheduled basis. However, the Jenkins tool, GitHub actions, or VBScript tools are preferred.
Sometimes the driver needs to be capable of adjusting the environment or runtime settings. Sometimes the driver needs to initiate based on time of day, or day of week, or some other scheduling method. The driver may also need to use some mechanism to determine when to run certain test scripts and not others.
Library Files Use
The Library Functions are referenceable. These functions are reusable across test case scripts.
UFT has its own *.QFL file that can contain none or more callable functions referenced by a UFT script. It supports passing data to the functions and receiving data or True/False conditions.
Robot Framework uses the Resource file approach. It can have no resource files, one or more resource files referenced from the test case file. And like UFT it stores referenceable functions and variables.
This idea causes the definition of data and manipulation of data to be controlled in a single place. Thus, it can reduce the maintenance costs for a development project and support environment.
The libraries I mentioned might be thought of as custom libraries for the tools. I say this because each tool also supports standard or external libraries that either come with the product or can serve as a plugin from other software products. UFT primarily uses this approach to extend its support to various application protocols. On the other hand, Robot Framework uses it to extend its support to protocols and functionalities that are not present in its software.
There is one more benefit. The use of these types of libraries supported by the test tools increases its value to testing activities.
Object Repository Support
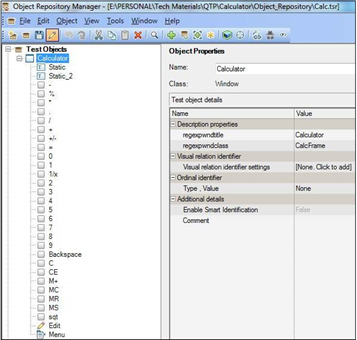
Object Repository has got all the objects that a test analyst or user would be acting upon. The image given below shows a sample list of all objects that might be added into a UFT repository. This occurs as a test analyst steps through parts of an application. UFT provides support in capturing the page object definitions into its object repository. Then it can refer to the repository during test script execution to confirm the script is using valid data definitions.
Robot Framework does not do this by default. Robot Framework has a plugin called Robotcorder that assists RF when navigating through a web application only. The plugin is limited to the Chrome browser. It generates Robot Framework code as you navigate through pages of a website. It detects what the page object definitions are and associates them with what RF keywords can process the data object.
Without this plugin, Robot Framework depends on locating page object definitions using the browser’s Inspect functionality which displays the HTML code structure. This can be a tedious and arduous activity. So, I do recommend the use of the plugin. It will provide help for almost 95% of the code need to perform the desired testing.
Robot Framework leaves you with an additional task regarding page object definitions. To reduce the complexity of the test case file, it is better to store the definitions into one or more resource files as variable definitions. Or I also have used an Excel spreadsheet to store the definitions in one column and reference the definitions using a single variable name. Multiple test case files can access that same Excel file.
UFT Object Repository Sample
Robot Framework Sample Repository using Excel
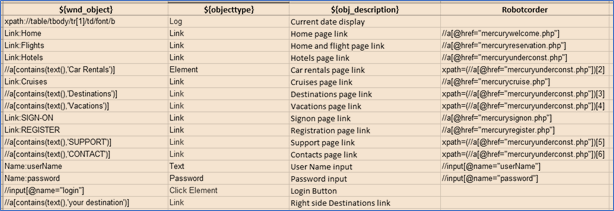
The HTML source is simple to complex making object identification also simple to complex. On any application page there can be varying XPATH values needed to reference the page objects. So, this is an example of some page objects. The operable page object identifiers are in the first column. And then some of the originally recorded object identifiers were that are shown in the Robotcoder column.
Inputs and Outputs
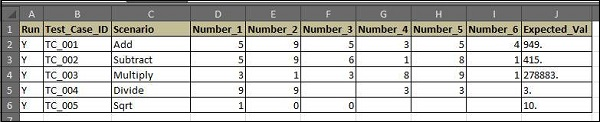
UFT uses a concept called DATATABLE which can contain entry data and control data like Robot Framework keywords. They can drive the tests and test the data with which UFT will act on the target window page objects. UFT not only supports the DATATABLE option but can input Excel spreadsheets to process just like the DATATABLE. Either way the data rows drive the script iteration process.
In the example, columns A and C can act as control data to identify which test case will process and what kind of function will be utilized. Column J can act as validation control. Robot Framework can use an Excel spreadsheet the same way as UFT. Both test tools can also use Excel spreadsheets for output processing. This can be a good way to report run statistics and special messages. I personally like the fact that both products have good test result reporting capability.
Automation Test Case Approach
The Execution Log
The Execution log file or output file created by UFT contains user actions and function log, which will enable the testers to debug upon script failures. Robot Framework uses what it calls the debug file that is created when “–debugfile (-b)” is added to the execution command – ROBOT. An example of this output is labelled “” below.
Log File
Log Output Sample
8/Jan/2014 5:09:16 PM: ************************************************* |
| 8/Jan/2014 5:09:16 PM: Calc Automation Started |
| 8/Jan/2014 5:09:16 PM: === Inside the Test Set :: Add === |
| 8/Jan/2014 5:09:16 PM: Executing the Function ‘FNCALCULATE’ |
| 8/Jan/2014 5:09:17 PM: The Actual Value after the Math Operation is 949. |
| 8/Jan/2014 5:09:17 PM: * * * * * * Test Case Exec Details * * * * * |
8/Jan/2014 5:09:17 PM: Test status :: Pass |
RF Debug File
============================================================================== |
Screen Shot Assistance
The use of the Screen Shot library or Screen Cap Library. Which is better? My short answer is – I don’t know. But the truth is that I kept getting a warning message trying to use the Screen Shot library to capture a screen image. So, with a little more research I discovered the Screen Cap Library. It not only provided me with an option to capture screen images, but I could specify JPG or PNG.
The JPG option displayed a hazy looking screen shot. But the PNG option displayed a nice clear screen shot. The only issue I had was because I use an extended screen display onto a large second monitor, the screen capture shows both monitor displays side-by-side. But I can live with that. However, if you cannot there is an additional parameter called “monitor”. Specify “MONITOR=1” to select the first monitor device to prevent both monitors from appearing in the capture shot.
To make use of the Screen Cap Library just execute the following PIP command from your RF Terminal window. Add Screenshot and Screencap Library as libraries in the SETTINGS section of your test case file.
pip install –upgrade robotframework-screencaplibrary
Below is an example of two lines of Robot Framework code. The first line is a command from the Screen Shot library. The second line is the screen capture command from the Screen Cap Library. As a reminder the “../” preface to RESULTS is used to reset the current directory to the parent.
Screenshot.Set Screenshot Directory ../Results |
ScreenCapLibrary.Take Screenshot name=screenshot format=png quality=0 |
I realized later that there is another option in the Selenium library keywords. It is called Capture Page Screenshot. It by default creates a report embedded PNG file.
Automation Test Tools (*Lab sessions included)
Test automation tools can have support for multiple application types, such as web, web services, desktop, mobile, mainframe, etc. What we will focus on for this portion of the training are web service application and web application test automation tools.
Web Service API Testing
There are two primary Web services: Simple Object Access Protocol (SOAP) and Representational State Transfer (REST). If you want to be confused read internet topics about SOAP and REST, web service, and API.
A web service is a kind of middleware software that supports machine-to-machine interaction over a network. A SOAP web service has an interface described in a machine-processable format (specifically, web Service Definition Language, or WSDL). This is where it stops being simple. A REST web service is typically a Restful service which uses the normal HTTP verbs of GET, POST, PUT and DELETE for working with the required internet components. All web services fulfill a specific task or a set of tasks in that it accepts a request and returns data based on the request.
API is the acronym for application programming interface — which is software intermediary that allows two applications to talk to each other. What protocols are used makes the difference between SOAP and REST.
- SOAP defines a standard communication protocol or set of rules specification for XML-based message exchange.
- REST uses HTTP and SMTP. But there is a variation of REST called RESTful which uses JSON only.
- SOAP and REST are both primary approaches to transferring data over a network using API calls for a web service. SOAP is not simple, but REST is simple.
How to test Web Service APIs
I want to go a little deeper into the discussion of SOAP and REST, so you are better informed. WSDL files are central to testing SOAP-based services. WSDL again is an acronym meaning Web Service Definition Language. The WSDL is the XML data associated with the SOAP web service to honor the request. And the response is also XML data. Here is a sample of the WSDL and documentation.
URL Address
https://www.w3schools.com/xml/tempconvert.asmx |
SOAP WSDL (XML Body)
<soap12:Envelope xmlns:xsi=”http://www.w3.org/2001/XMLSchema-instance” xmlns:xsd=”http://www.w3.org/2001/XMLSchema” xmlns:soap12=”http://www.w3.org/2003/05/soap-envelope”> |
<soap12:Body> |
<FahrenheitToCelsius xmlns=”https://www.w3schools.com/xml/”> |
<Fahrenheit>75</Fahrenheit> |
</FahrenheitToCelsius> |
</soap12:Body> |
</soap12:Envelope> |
SOAP XML Response
<?xml version=”1.0″ encoding=”utf |
| 8″?><soap:Envelope xmlns:soap=”http://www.w3.org/2003/05/soap |
| envelope” xmlns:xsi=”http://www.w3.org/2001/XMLSchema |
instance” xmlns:xsd=”http://www.w3.org/2001/XMLSchema”><soap:Body><FahrenheitToCelsiusResponse xmlns=”https://www.w3schools.com/xml/”><FahrenheitToCelsiusResult>23.8888888888889</FahrenheitToCelsiusResult></FahrenheitToCelsiusResponse></soap:Body></soap:Envelope> |
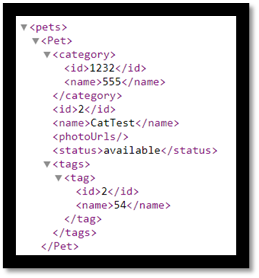
Now for a REST web service this is where it is in my opinion easy. Here is a sample REST web service request: https://petstore.swagger.io/v2/pet/findByStatus?status=available. This request has no WSDL. The request is in HTML. The response is an XML list of pets available. Here is a sampling of the response in XML.
The additional part possible with a REST web service is when the request uses HTML it is possible to make four different requests as described here. The request in the example was a GET request to find by the status. Other requests can be by petId. This is known as an endpoint. Also, it can be a POST, PUT or DELETE request where information is inquired upon, inserted, updated, or deleted.
- Sending a GET request to /pet/{petId} would retrieve pets with a specified ID from the database.
- Sending a POST request to /pet/{petId}/uploadImage would add a new image of the pet.
- Sending a PUT request to /pet/{petId} would update the attributes of an existing pet, identified by a specified id.
- Sending a DELETE request to /pet/{petId} would delete a specified pet.
The documentation can reveal other requests that can be made using the HTML functions. I hope you have a better understanding of web services. This can be considered manual testing of web services.
There is one more tool that is a manual test as well. It is with the use of a tool called “cURL”. cURL is an acronym for Client URL (cURL, pronounced “curl”). It is a command line tool that enables data exchange between a device and a server through a terminal. Using this command line interface (CLI), a user specifies a server URL (the location where they want to send a request) and the data they want to send in the request.
The cURL command is used in a windows command prompt or MAC terminal prompt. There are several options available with the command as you can see in the display. If you specify the “–help all” you will find the command has many options for accomplishing the following:
- FTP upload
- Proxy support
- SSL connections
- HTTP post
Here is a sample of how to use cURL to process a REST web service:
cURL -i -H ‘Content-Type: application/json’ https://petstore.swagger.io/v2/pet/findByStatus?status=available
curl -v https://petstore.swagger.io/v2/pet/9223372036854767768 -H ‘accept: application/json’
C:\>cURL -i -H ‘Content-Type: application/json’ https://petstore.swagger.io/v2/pet/findByStatus?status=available
[{“id”:9223372016900014175,”category”:{“id”:0,”name”:”string”},”name”:”doggie”,”photoUrls”:[“string”],”tags”:[{“id”:0,”name”:”string”}],”status”:”available”},{“id”:9223372016900014182,”category”:{“id”:0,”name”:”string”},”name”:”fish”,”photoUrls”:[“string”],”tags”:[{“id”:0,”name”:”string”}],”status”:”available”},{“id”:9223372016900014183,”category”:{“id”:0,”name”:”string”},”name”:”fish”,”photoUrls”:[“string”],”tags”:[{“id”:0,”name”:”string”}],”status”:”available”},{“id”:9223372016900014186,”category”:{“id”:0,”name”:”string”},”name”:”fish”,”photoUrls”:[“string”],”tags”:[{“id”:0,”name”:”string”}],”status”:”available”},{“id”:9223372016900014187,”category”:{“id”:0,”name”:”string”},”name”:”fish”,”photoUrls”:[“string”],”tags”:[{“id”:0,”name”:”string”}],”status”:”available”},{“id”:9223372016900014198,”category”:{“id”:0,”name”:”string”},”name”:”fish”,”photoUrls”:[“string”],”tags”:[{“id”:0,”name”:”string”}],”status”:”available”},{“id”:9223372016900014213,”category”:{“id”:0,”name”:”string”},”name”:”fish”,”photoUrls”:[“string”],”tags”:[{“id”:0,”name”:”string”}],”status”:”available”},{“id”:9223372016900014246,”category”:{“id”:0,”name”:”string”},”name”:”Puff”,”photoUrls”:[“string”],”tags”:[{“id”:0,”name”:”string”}],”status”:”available”},{“id”:9223372016900014281,”category”:{“id”:0,”name”:”string”},”name”:”fish”,”photoUrls”:[“string”],”tags”:[{“id”:0,”name”:”string”}],”status”:”available”} |
In this sample the pet data that is requested are those that have a status of available on the web service. The response reports in JSON format the pets that are available. The options included in the command were -i and -H which requests verbose response and insert response type in header.
Tools and techniques for Web Service API testing
Although I am not trying to cover Web service and API testing thoroughly, I have a little more training data to cover. This time I want to focus your attention on tools like SOAP UI, ReadyAPI, and Parsers for API testing.
- Using Test tools for Web Service API testing includes Creating and executing requests, testing responses, organizing collections, etc.
- Example: Verify a REST API that returns the current weather conditions of a given city.
- https://api.open-meteo.com/v1/forecast?latitude=29.76&longitude=-95.36&daily=temperature_2m_max¤t_weather=true&temperature_unit=fahrenheit&timezone=America/Chicago
- {“latitude”:29.767237,”longitude”:-95.35443,”generationtime_ms”:0.2549886703491211,”utc_offset_seconds”:-18000,”timezone”:”America/Chicago”,”timezone_abbreviation”:”CDT”,”elevation”:15.0,”current_weather”:{“temperature”:66.7,”windspeed”:4.8,”winddirection”:63.0,”weathercode”:3,”time”:”2023-04-02T01:00″},”daily_units”:{“time”:”iso8601″,”temperature_2m_max”:”°F”},”daily”:{“time”:[“2023-04-02″,”2023-04-03″,”2023-04-04″,”2023-04-05″,”2023-04-06″,”2023-04-07″,”2023-04-08″],”temperature_2m_max”:[80.5,85.2,86.4,75.0,63.9,65.2,64.6]}}
- Example: Verify a SOAP Web Service that returns the currency exchange rate for a given currency pair.
- SOAP UI Samples and ReadyAPI testing tool
- SOAP UI Tutorial
- Documentation: https://petstore.swagger.io/
- REST Service: https://petstore.swagger.io/v2/pet/findByStatus?status=available
- SOAP Test Documentation
- XML Parser
- SOAP UI Samples and ReadyAPI testing tool
Web Application Testing (Act 1)
There are many web application testing tools available on the market. Some have commercial licensing while others are open-source tools that are free to use. And just because they are free does not diminish their capabilities. My last count was over 50 web or mobile software test tools are available. The tools I am going to talk about here are all open-source and are not lacking in ability to test web applications. I want to introduce you to Playwright, Selenium, Python Pytest. These are tools I have been using lately and working on developing a Hybrid test framework that I desire to promote test teams looking for a long-term solution.
Introduction to Playwright Testing
Playwright is a powerful open-source testing tool that enables web developers and test analysts the ability to automate web application testing. It provides a high-level API to interact with web pages and applications, and it supports multiple programming languages, including Python. In this lecture, we will learn about Playwright, its purpose, and its components. When I talk about Playwright I like to include its interaction with Python. But it supports several other languages.
Definition of Playwright Testing
Playwright is a tool that allows you to automate web application testing to perform end-to-end testing. Playwright was created by Microsoft and is open-source, and it supports modern web browsers, such as Chromium, Firefox, and WebKit. Microsoft Edge and Chrome are the most widely used Chromium-based browsers.
Purpose of Playwright Testing
The primary purpose of Playwright testing is to automate the testing of web applications. But Playwright, supports generating and writing automated tests in multiple languages, such as JavaScript, Typescript, Java, C#, and Python. Playwright can be used to test web applications on different platforms and browsers, and it provides detailed reports of test results.
Components of Playwright Testing:
Playwright consists of three main components: the Playwright library, the Playwright test runner, and the Playwright CLI or Command Language Interface.
The Playwright library is the core of Playwright and provides a high-level API to interact with web pages and applications. Meanwhile, the library allows you to control web browsers, navigate pages, interact with web elements, and perform other tasks. With the Playwright test runner, you have a tool that allows you to run Playwright tests. It provides an easy-to-use interface for running tests and generating test result reports.
The Playwright CLI is a command-line tool that allows you to execute Playwright scripts and interact with web applications. The CLI can be used to perform different tasks, such as launching a web browser, capturing screenshots, and recording videos which are nice features.
Setting up for Playwright Testing:
The setup process for Playwright is a little involved. You need to have what I call a test environment to work with. There are several test environment software tools available. And developers and Test Analysts have their preferences. I am no different. I like PyCharm. PyCharm is one of many good IDE’s. Here is my short advertisement. PyCharm is the way to go if you want a powerful, focused, and well-configured Python development environment. However, Microsoft VS Code is preferred if you want something lightweight with the ability to customize. Both are excellent tools that, depending on how you choose to utilize them, can be used for a variety of tasks. In other words, they are good test environments for not only programming, but testing.
To set up Playwright for testing, we need to install the Playwright library and the Pytest framework. We can do this by running the following commands in the terminal in the IDE terminal window. For windows-centric people that is a command prompt window. Before I proceed further, I feel the need to bring beginners up to speed. If you have not already invested in a test environment IDE, I recommend PyCharm or VS Code. They are both free and worthy of your time.
Let me give you links to what I will call instruction sites for recommended test environment IDE setups. Before you install and setup your test environment IDE, install the latest version of Python from the official site found in your search engine. To get install procedures for all OS platforms go to the following sites.
- For Microsoft VS Code with Python: MS VS Code with Python
- For PyCharm with Python: PyCharm Community Version
Now, here’s a step-by-step guide for installing and configuring PyCharm IDE with Python and other tools needed for testing: *This is mostly for Windows 10/11 users.
- Download and install Python:
- Go to the official Python website and download the latest version of Python.
- Follow the installation instructions for your operating system.
- Install PyCharm IDE:
- Go to the official PyCharm website and download the Community or Professional edition of PyCharm, depending on your needs.
- Follow the installation instructions for your operating system.
- Configure Python interpreter in PyCharm:
- Open PyCharm IDE.
- Go to “File” > “Settings” (on Windows) or “PyCharm” > “Preferences” (on Mac).
- Click “Project: <project name>” > “Python Interpreter” on the left-hand side.
- Click the gear icon on the right-hand side and select “Add”.
- Select “Existing environment” and navigate to the location where you installed Python.
- Select the Python executable file (python.exe or python3.exe) and click “OK”.
- PyCharm will now configure the Python interpreter.
- Install additional Python packages:
- To install additional Python packages, go to “File” > “Settings” (on Windows) or “PyCharm” > “Preferences” (on Mac).
- Click “Project: <project name>” > “Python Interpreter” on the left-hand side.
- Click the “+” button to install new packages.
- Search for the package you want to install, select it, and click “Install Package”.
- PyCharm will install the package and add it to the project interpreter.
- Install testing tools:
- To install testing tools, such as Pytest or Selenium, follow the same steps as above for installing additional Python packages.
- Or use PIP, such as, pip install selenium
- Configure Pytest in PyCharm:
- Open PyCharm IDE.
- Go to “File” > “Settings” (on Windows) or “PyCharm” > “Preferences” (on Mac).
- Click “Tools” > “Python Integrated Tools” on the left-hand side.
- Select “pytest” as the default test runner.
- Click “Apply” and “OK”.
- Configure Selenium web drivers:
- Download the web driver
Code Requirement: |
| pip install pytest-playwright |
| pip install pytest |
| pip install selenium |
pip install webdriver-manager (see https://pypi.org/project/webdriver-manager/ for details) |
After installing the required packages, you can create a test script and start writing Playwright test cases.
Writing and Executing Playwright Test Cases:
To write and execute Playwright test cases, you can use the Pytest framework. Pytest provides a simple and easy-to-use interface for running tests and generating test result reports.
Here is an example:
Verify a Web Application Login Functionality
Let’s create a Playwright test case to verify the login functionality of a web application. In this example, we will use the Pytest framework and Playwright library to automate the login process.
First, you need to import the required packages and define the test case:
Code Requirement: |
| import pytest from playwright.sync_api |
| import Playwright, sync_playwright |
def test_login(): with sync_playwright() as playwright: |
| browser= playwright.chromium.launch() |
| page = browser.new_page() |
page.goto(“https://example.com/login”) |
In this code, imports were used to load the required packages and define the test case. The “WITH” statement creates a Playwright instance and launches a Chromium browser. The remaining code created a new page and navigated to the login page of the example web application.
The next operation needs to interact with the login form and enter login credentials:
Code Requirement: |
| page.fill(‘input[name=”username”]’, ‘testuser’) |
| page.fill(‘input[name=”password”]’, ‘testpass’) |
page.click(‘button[type=”submit”]’) |
Here, the interaction with the login form and entry of login credentials took place. In this code, the “PAGE.FILL” method was used to enter username and password in the login form, and the “PAGE.CLICK” method was used to click the login button.
Finally, to verify the login result and assert that the user is redirected process the dashboard page as shown in the next code display.
Code Requirement: |
| page.wait_for_selector(‘#dashboard’) |
| assert page.url == ‘https://example.com/dashboard’ |
browser.close() |
In this code, the PAGE.WAIT_FOR_SELECTOR method was used to wait for the dashboard selector to appear, and the assert statement was used to verify that the URL of the page is the dashboard URL. Then the browser is closed using the BROWSER.CLOSE method.
To run this test case, you can use the following command in the terminal:
CLI syntax: |
pytest test_login.py |
This will execute the test login test case and generate a test result report.
Recap:
My expectation was to increase learning about Playwright, its purpose, and its components. We looked at how to set up Playwright for testing, write a Playwright test case using Pytest, and execute the test case. The Playwright test case was designed to verify the login functionality of a web application and used the Pytest framework to run the test case and generate a test result report. Playwright provides a powerful and flexible way to automate web applications and is an essential tool for web developers and test analysts alike.
Web Application Testing (Act 2)
Introduction to Selenium Testing:
Selenium is a popular open-source testing tool that allows web developers and test analysts to automate web application testing. It provides a high-level API to interact with web pages and applications and supports multiple programming languages, including Python. At this time, we will learn about Selenium, its purpose, and its components.
Definition of Selenium Testing:
Like Playwright, Selenium is a tool that allows you to automate web application testing and perform end-to-end testing. Selenium is also open-source and supports web browsers, including Chrome, Firefox, and Safari.
Purpose of Selenium Testing:
By using Selenium, a test script developer can write automated tests to verify the functionality of web applications, such as login forms, shopping carts, and other web application components. Selenium can be used to test web applications on different OS platforms and browsers, and it provides some reports of test results.
Components of Selenium Testing:
Selenium consists of three main components: the Selenium WebDriver, the Selenium Grid, and the Selenium IDE.
- The Selenium WebDriver is the core of Selenium and provides a high-level API to interact with web pages and applications. The Selenium WebDriver allows you to control web browsers, navigate pages, interact with web elements, and perform other tasks. There is now an additional tool called the WebDriverManager which is a library that supports auto installation of the latest webdrivers needed during test script execution.
- The Selenium Grid is a tool that allows you to run Selenium tests on multiple machines and browsers simultaneously. It provides an easy-to-use interface for running tests and generating test reports.
- The Selenium IDE is a new browser extension that allows you to record and replay Selenium tests. It provides an easy way to create Selenium tests without writing any code. The code it generates has a file extension of SIDE. The test scripts can run either in the browser or in the test environment using NPX which is the Node Package Executor tool also used by Playwright.
Setting up for Selenium Testing
To set up Selenium for testing, install the Selenium package using PIP. This done by running the a PIP command in the test environment terminal:
CLI syntax: |
pip install selenium |
This will install the Selenium package and its dependencies.
Next, download the web driver executable for the browser for use. For example, if you want to use the Chrome browser, download the ChromeDriver executable from the Selenium website. Or as I mentioned earlier there is now a WebDriverManager tool that is better.
Writing and executing test cases with Selenium:
To write and execute test cases with Selenium, one solution is to use the Pytest framework. Pytest is a popular testing framework that provides a simple and powerful way to write and execute tests.
To create a Selenium test case with Pytest, import the required packages and define the test case. Here is an example test case that verifies the login functionality of a web application:
Code Requirement: |
| import pytest |
| from selenium import webdriver |
| from selenium.webdriver.common.keys import Keys |
| def test_login(): |
| driver = webdriver.Chrome() |
| driver.get(‘https://example.com/login’) |
username_input = driver.find_element_by_name(‘username’) password_input = driver.find_element_by_name(‘password’) |
| login_button = driver.find_element_by_css_selector(‘button[type=”submit”]’) username_input.send_keys(‘testuser’) |
| password_input.send_keys(‘testpass’) |
| login_button.click() |
| assert driver.current_url == ‘https://example.com/dashboard’ |
driver.quit() |
In this code, the required packages are imported, and the test case is defined. The WEBDRIVER.CHROME method is used to create a new Chrome driver instance and navigate to the login page of the example web application.
Next, are the username input, password input, and login button elements using the DRIVER.FIND_ELEMENT_BY_* methods. Then the SEND_KEYS method is used to enter login credentials and the click method to click the login button.
Finally, the next assert statement is used to verify the login result and closed the browser using the DRIVER.QUIT method.
To run this test case, you can use the following command in the terminal:
CLI Syntax: |
pytest test_login.py |
This will execute the test login test case and generate a test result report.
Recap:
In recap, we looked deeper into Selenium, its purpose, and its components. You saw how to set up Selenium testing, write Selenium test cases using Pytest, and execute them. We reviewed a Selenium test case used to verify the login functionality of a web application and used the Pytest framework to run the test case and generate a test result report. Selenium provides a powerful and flexible way to automate web application testing and is a useful tool for web developers and test analysts.
Closing Remarks
For my closing remarks, I am using this time to talk about one more subject I mentioned earlier. That is the topic of test objects. I mentioned that the idea came from a feature in the UFT product called Extensibility. The product allows you to add your own test extension as what they call a test agent. It supports testing of an application with the use of pre-defined parent and child test objects along with methods. Then in the script code you use those objects and methods to test the various screen objects in the target application.
I do like the concept and have used it in the Robot Framework tool for that kind of testing. Let me explain this a little more in case you find yourself using UFT or some other tool that does something similar. The concept is different from the normal test case design done from test requirements.
Test objects in a web application are defined in a hierarchy as: pages for flow tests and parent reference, child objects for page input fields, actionable buttons, images, links, etc.; and methods that describe a test technique we talked about, such as Equivalent Class Partitioning, Boundary Value analysis testing, etc.
The approach then supports an input spreadsheet or file to run data-driven test cases that may have one or more tests for each input data field to meet application requirements by input data fields. So, your automation test scripts are designed to navigate to a specific page and test the necessary fields for whatever values are valid and invalid, then report results.
Software Demonstration
I set aside time in this training to demonstrate Web service API testing and to have you see some web application test tools demonstrations in my personal test environment. Then you will participate in a lab session using two record and playback test tools. One is easy to set up and use. The other requires more steps to set up.
Since the Playwright setup is more involved, I will use my test environment to demonstrate its Record and Playback feature. It has been considered by some to be a test tool feature that is codeless. Code is still generated in a language or even multiple languages like Playwright does. But as a test analyst you should know better. It is great to have a test tool that generates code. But you should not be casual about never needing to modify or enhance code. The more a test script is modified or enhanced the better the possibility of its longevity.
If there are no questions, it is lab time.
Lab/Assessment Session
- Working on real-world scenarios to reinforce the concepts and techniques covered in the module
- Target online web application: Sauce labs
- Target Tool #1: Selenium IDE
- Open Chrome browser
- Go to the triple dot icon upper right; select More Tools from menu; select extensions
- Click on the burger menu icon on top left
- Click on the open chrome web store selection near bottom
- Search for Selenium IDE
- Click to select the software and then click the Add to Chrome button
- Open extensions from the Extensions icon on top right, and select Selenium IDE
- Target Tool #2: Playwright Codegen
- Python Install by installing PyCharm IDE or VS Code
- Go to Playwright Website for installing Playwright in your PyCharm test environment
- There is a sample test script to confirm your setup
- Opportunities for you to practice and apply the tools and techniques on your own
- With the PyCharm, Python, and Playwright tools installed you have a test environment
- At the Playwright website for Python, it describes how to use Codegen under the python DOC > Test Generator option
- Hands-on exercise
- Selenium IDE test using https://www.saucedemo.com/
- Go to the app site and get familiar with app to determine a test you want to record
- Start with Login and Logout
- Launch Selenium IDE
- Start New Project
- Provide application URL and navigate through the app to test
- Stop recording and run the test from Selenium IDE